Physical Biology Boot Camp
These are notes from the Physical Biology Boot Camp that I participated in on 8-14 Oct 06 at Caltech.
About the boot camp
Participants
Instructors
- Rob Phillips (Caltech ME/APh)
- Hernan Garcia (Caltech Ph)
- Tristan Ursell (Caltech APh)
- Paul Grayson
- Lin Han
- Heun Jin Lee
- Eric Peterson
- Frosso Seitaridou
- Dave Wu
- Tabita Winther
Recruits
|
Visiting faculty
Others
|
Organization
There are basically four parts of boot camp:
- DNA Science - learning how to manipulate DNA
- Size of things - learning the various spatial scales in biology
- Rate of things - learning the various temporal scales in biology
- Project - a small project, working with a graduate student or visitor
Size of things
In the "size of things" section of the boot camp, we learned how to use microscopes to take (calibrated) measurements of various cells. This section of the bootcamp started on Sunday evening, when we learned how to use some of the microscopes in 040 Keck.
Regular microscopes
- Olympus
Fluorescence microscopes - these microscopes can illuminate a sample and measure fluorescence, in addition to bright field and dark field measurements
- Zeiss AX10 - this is a manually controlled fluorescence microscope. Alberto and I used it for our fluorescence measurements of a stained bovine pulminary cell on Sunday evening.
- One thing to watch out for on this scope is that when you save the files you need to uncheck the "save as 8 bit" box. This seems to always turn on, even if you reset the defaults. It really cuts down the resolution of your pictures.
- I retook the bovine pulminary cell pictures on Monday morning.
- Olympus CX41 - this is an computer controlled, inverted microscope. We used this one for our E. coli fluorescence pictures.
Stereoscopes - there are also stereoscopes (or dissection scopes) in the lab for use with thicker samples. I didn't use an of these.
For all of the microscopes that we used, we used graticules with 10 um lines to do calibrations. All of our pictures are supposed to have scale bars on them (easy to do in ImageJ).
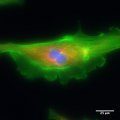
Bovine pulminary cell using Zeiss @ 40x
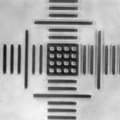
Graticule on Zeiss @ 40x

E. coli w/ 1 mM IPTG, bright field

E. coli w/ 1 mM IPTG, yellow fluorescence


Rate of things

The rate of things portion of the boot camp involved measuring how quickly E. coli and yeast grew. We did this by taking movies on a microscope and also using a spectrophotometer to measure optical density. To calibrate the optical density measurements (OD), we plated out our samples so that we could see how many colonies grew (and hence compare the actual number of cells to the OD measurements. Plating out the cells involved doing a lot of dilution, so that the number of cells would be sufficiently small. The figure at the right shows the OD as a function of time for both yeast and E.coli (note that the x axis label is wrong - it should be minutes).
E. coli growth
We took OD measurements and samples every 20-30 minutes. The samples were streaked out on plates and then put in an incubator to grow. About 24 hours later, we came in to count the colonies (not easy, since they had grown quite a lot).
- Media:pbbc06-ecoli.mov - E. coli growing (taken by my lab partner, Alberto). This shows E. coli dividing about every 1000 seconds (15 minutes).
Yeast growth
- Media:pbbc06-yeast.mov - Yeast growing (taken with the help of Stephanie. This shows yeast dividing. Notice that the culture is contaminated with some sort of bacteria.
Because of the contamination of the yeast (which was later tracked down to the original growth medium that we used), our measurements on yeast are not very useful.

E. coli at 100x

Culture plates after 24 hours
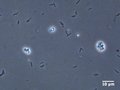
40x picture of yeast (plus some bacteria)

100x picture of yeast (taken by Stephanie)


Photo bleaching
We took a bunch of images of photobleaching, but didn't have time to process them. From what other groups showed, the time constant for photobleaching was around 1 minute of exposure.
DNA Science
The DNA science section of bootcamp involved learning how to do cloning in E. coli. The basic idea of the project that we undertook was to place a fluorescent gene into a plasmid. We started with the pZS25 plasmid, which is a modular plasmid. Here is now to read the "part number" (Lutz and Bujard, 1997):
| pZ | Origin of replication | resistance marker | regulatory unit | |||
| E | ColE1 | 1 | Ampicilin | 1 | P_LtetO1-1 | |
| A | p15A | 2 | Kanemycin | 2 | P_LlacO1-1 | |
| S | pSC101 | 3 | Chloramphenicol | 3 | P_AllacO1-1 | |
| S* | pSC101* | 4 | Spectinomycin | 1 | P_lac/ara-1 | |
| 1 | Ampicilin | 5 | P_lacUV5-1 | |||
So pZS25 uses an SC101 origin of replication (low copy number; about 10 copies), has kanemycin antibiotic resistance, and uses P_lacUV5-1 as its regulatory unit (repressed by LacI and induced by IPTG).
The actual plasmid that we used was a version that had been modified by Hernan Garcia so that the promotor region had modifications that could be used to study the structural properties of DNA. Hernan created plasmids of the form pZS25.TA-94-YFP, which is a plasmid with a promotor region of length 94 (default), using a certain combination of sequences between the operator regions for lacI. The cloning that we want to do is to replace YFP with lacZ (which we extracted from a pZE21 plasmid).
Step 1: create pZS25 vector (Sun afternoon) - the first thing that we did was to use restriction enzymes to create our "vector", where we would eventually insert the lacZ gene. We did this but cutting the pZS25 plasmid using HindIII and KpmI in a "double digest". To get some sense of how the restriction enzymes worked, we did two controls as well: a KpmI contro and a HindIII control. In all, we generated four mixtures:
- Double digest
- KpmI control
- HindIII control
- Uncut plasmid
Step 2: extract lacZ from pZE21 (Sun afternoon) - to remove lacZ from the pZE21 plasmid, we used the HindIII and EcoR1 restriction enzymes. Hernan had already done the HindIII digest, so we only had to do ecoR1. For reasons that don't make complete sense to me, this DNA fragment was called lambda + HindIII.
Step 3: run gel and extract DNA (Sun afternoon) - to extract out the DNA that we created, we ran a gel. This took several hours (during which we were learning to use the microscopes). Here's a picture of Richard and Albert's gel:

The first four tracks correspond to the DNA strands listed above. The fifth and sixth tracks are 1k bp and 100 bp ladders. Tracks 7 and 8 correspond to lambda + HindIII and lambda + HindIII + EcoR1. Track 9 is dye and track 10 was a test track (done by one of the instructors).
From this gel, you can see that we got a partial digest for KpnI and HindIII. Hernan redid the digest overnight so that we would have better product to work with.
Step 3: PCR amplification (Mon morning) - the next thing we did was to purify our sample. We started with the DNA from the gel and used a kit to purify it (remove the agarose, etc). After the PCR (?), we use a nanospectorphotometer in the Phillips lab to find the concentration of DNA (14.7 ng/ul).
Step 4: ligation (Mon morning) - once we had our purified DNA, it was time to ligate it to the lacZ that had been pulled out of the pZE21 plasmid. We used three different ratios of vector (pZS25) to insert (lacZ) - 1:3, 1:1 and 3:1. We also ran a 0 insert control. Once these were mixed up, Hernan did some additional "killer cuts" to remove anything that we didn't want in our DNA.
Step 5: transformation (Tue morning) - at this point we are ready to transform our ligated DNA into cells so that we can grow the plasmid. We did this by putting some competent cells (DH5aZ1, which has no lacZYA but does have lacI, tetR, and araC) plus our ligation into a special "electroporation" couvette. This was then taken over to a machine in Broad and electrocuted, which is supposed to let the bacteria accept the DNA. We then put the cells into a 37 degC incubator for 30 minutes.
Step 6: selection (Wed morning) - finally, to select out bacteria with our plasmid inside, we grow the transformed bacteria in the presence of Kanamycin (antibiotic), IPTG and X-gal. The IPTG is an inducer for lac, which works by blocking LacI somehow. X-gal is an arabanose substitute that turns blue when digested (by lacZ). What this all means is that as you get colonies of cells, the ones that have our plasmid in it will survive (kanamycin resistent) and also turn blue (have lacZ). So we grow up the colonies and cut out the blue ones.
What this step involved was taking a small amount of each of our cultures and plating them out onto separate places (four total, one for each of the ratios of vector to insert plus the control). We then let these grow for about a day in a 37 degC incubator and looked for the blue colonies on Thursday morning. We extracted these and put them into another culture dish to grow them some more.
Step 7: sequencing (Fri, by Hernan) - to verify that we had what we were looking for, Hernan took the cultures in for sequencing on Friday. Unfortunately, our particular strain (E96) did not have any cultures in the dish, so apparently we didn't manage to extract them properly at the end of step 6.